Friday, November 15, 2013

New Throw Pillows To Match My Tuffet- A Tutorial


So after I recovered my tuffet,
I decided that the throw pillows on the sofa
and chairs were looking old and dull.


I measured my pillows and cut the pieces I needed,
allowing an extra inch all the way around,
for a 1/2" seam allowance.

These pillows were about 17" square.
So I cut two pieces of 18"x18" for each pillow.


I pulled out some of the leftover piping
I had from when I made my new sofa slipcover.
You can read all about my sofa slipcover and how I made the piping
HERE.

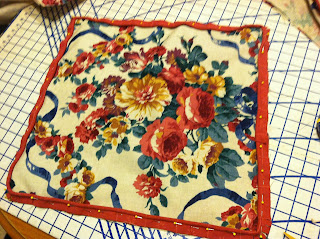
I pinned it along the outside edge of one
side of the pillow fabric.


I snipped into the seam allowance of the piping
so it would curve around the pillow corner.


I cut the piping a bit long where it meets up.


I cut off the excess piping cord to reduce bulk.


Folding the edge of one side of the piping under,
I wrap it around the other side.


Then I just pin it and sew it down.

I am using my piping foot on my Janome
machine but I usually use my zipper foot
on my Bernina for large piping.


This is what it looks like with the piping all pinned in place.


Next, I pulled out a long zipper
from my stash so I could make the new
pillow cover removeable.


Using my zipper foot,
I sew the zipper onto the piping,
wrong side up. 
If I sew it right side up, I will not
be able to open up the zipper when it is on the pillow.


Next, I lay the back piece of the pillow
on to of the front piece, 
right sides together,
matching up the sides,
and pin the seam allowances to the other side of the zipper.

I sew the zipper in place.


After the zipper is sew in place,
I can lay open it up and see that it is ready
to sew the rest of the pillow sides together.


This is how it looks from the back side.
Make sure that you have unzipped the zipper several
inches so you can get into the pillow cover
after the sides are all sewn.


Match up your sides and pin all the way around.


Using your zipper or piping foot,
sew as close to your piping edge as you can.
You can follow the line of stitching you used
when you sewed the piping on, 
or move your needle position 1 or 2 clicks
further away from your foot.

Go slow and careful around the corners.
You can see that I am sewing over the extra length
of the zipper end. 


When you finish sewing, 
you can trim the corners or not.

I usually do not for piped corners
as the extra fabric kind of fills out
the corner nicely.

 
The zipper is snug against the piping and makes it very easy
to remove the pillow cover for washing,
or just when you decide you need a change.

This was actually an old zipper that I reused.


All finished and pretty.


Because of the placement of the print on the fabric,
and because I didn't want to waste any
of my beloved fabric,
I was not able to center the floral motif on each pillow.

But I love them anyway.


I am glad I finally cut into this fabric.

And pillows are a great way to add 
color using just a little bit of a favorite fabric.

Happy Sewing!


Wednesday, November 13, 2013

Sprucing Up My Tuffet


This is my beloved tuffet.

As in 
"Little Miss Muffet sat on a tuffet."


I made this tuffet about 10 years ago.

Ahnalin was waving her hand in front of my 
phone so excuse the blur.

I built it out of junk I begged
for from the guys in the back room
of the furniture store where I used to work.

Part of it is a miniature mattress sample,
wrapped in foam and batting,
stapled to a piece of plywood.


The bun feet were from an old dresser or something.

This is NOT a beautifully built piece of 
fine furniture!


I had been putting off recovering it because
I loved the linen toile I had used originally. 
But the stains on it were getting ugly and
gross and it was definitely time to be freshened up.

I had purchased this colorful floral linen print
from Schumacher when I was pregnant with India.

I have this problem with fabric.

You see, I fall in love with a certain fabric,
and then I hold on to it forever, 
afraid that if I cut into it, 
I will be disappointed if it doesn't turn out perfectly.


I decided to get over myself and use it!

So, I grabbed my handy dandy staple gun
and went to town!

I measured the tuffet and
realized I could just wrap the fabric around it.
So I cut off the amount I needed and got going.


There was almost no sewing involved in this project.

I folded the fabric around the rounded corners 
and stapled it in place.


I cut the fabric around where the bun feet needed
to be able to screw back in.


Yes, my staples are not perfectly placed.
But I had to remind myself that most people would
not turn over my tuffet to inspect my staples.

In my usual quest for perfection,
I can procrastinate instead of just plowing forward.

I decided this did not need to be perfect.


I got out some leftover piping
and stapled it to the bottom edge
to make it look more finished.


I curved round the corner and stapled it in place.


When I make pillows or slipcovers,
I sew the piping to be continuous,
but decided to just staple the 
end piece over the starting piece.


I am not super strong in my hands,
so sometimes the staples don't go all the way in.
So, I just use my tack hammer to hammer them down.


I screwed the bun feet back on,
and yes, that is the selvage stapled down.


All done!

After putting off this little project for years,
I got it done in about an hour,
start to finish!

I also made new throw pillow covers to match.

That will be the next post!


Monday, November 11, 2013

The Dora Dress By Genniewren


I was so grateful and happy to be able to test 
Genine Allan's new pattern for girls.

The "Dora" dress pattern is beautiful!!


This dress or jumper pattern
comes with a several different options
for design flexibility and creativity.

You can use several different fabrics in the skirt.


The ruffle is attached on top of the skirt
and can be sewn with a regular rolled hem
or a serged rolled hem finish.


The back is closed with buttons,
and I indulged in my passion for rick rack
on the bodice.


The skirt is very full...


which makes it perfect for twirling!


All of which makes for a very happy Ahnalin!

The pattern offers an option without the ruffle,
and you can add a darling apron as well!


And there is even a matching 18" doll dress
pattern available!!

You can purchase the girls pattern,
which includes girls sizes 1-16 in one Ebook PDF.

Or you can purchase the girls AND doll pattern
for a special bundle price 

I love Genine's patterns.
Her instructions are very clear
and always fit perfectly. 

This is her first pattern for girls,
but her patterns for 18" dolls are legendary!


I was thrilled to test her 
"Harriet" sailor dress pattern this summer.
You can see that post 

Thank you for allowing me
to test again for you Genine.

Your patterns are lovely and 
you know what little girls love.

Happy Sewing!

Sivje


Wednesday, October 30, 2013

Red Dragon Smocked Dress


One of my favorite little girls requested
a red dress with a dragon smocked onto it.

I searched and searched and had no success finding
a smock plate with a dragon,
nor one with Chinese lanterns.


She is the same age as my Ahnalin and both girls
love the strong girl warrior of Chinese legend
depicted in the Disney movie "Mulan".


We decided to let the movie influence my smocking.
As there is no pattern for this character,
I just started smocking free hand,
 to see how the little dragon
would arrive on the fabric. 
And he arrived full of personality!


 The Chinese lanterns were actually
a machine embroidery file that I purchased.
I had not machine embroidered on pleated fabric
before, but I think it worked well.


She requested her name to be embroidered on the skirt
in gold thread and Chinese style writing.

I hemmed the dress with my favorite growth tuck
hem treatment.


As she has a December birthday, she prefers
her dresses to have long sleeves and 
twirly skirts have been her preference as well.

 
Long sleeve cuffs with star button and 
candy cane corded piping. 
The angle of the picture is weird
and the piping is folding all wonky because 
I was holding with one hand and taking
the picture with my phone. 
I think I should have asked someone to 
take the photo for me!


This is the back of the dress.

I am now remembering why I never posted these
photos last year. 

I was thrilled with how the dress turned out,
be the photos were so awful.  

I think I need some photography help!
 
I have several other creations from the 
last year that I never shared.
I need to get busy and post them!

For today, I am making a blue raw silk
dress for India to wear to a gala this weekend.
I PROMISE I will post photos when I finish the dress.

Happy Sewing.