Wednesday, August 21, 2013

25 Years Ago And Still Today


August 21, 1988

We were practically babies.

He had just completed his Masters Degree
in electronic music and recording engineering.
 
I had just turned 21, three weeks
before the wedding,
and was working as a home furnishings 
specialist at Laura Ashley.
 
We were so completely crazy in love with each other.
 
Don's father and he had started to
build our little love nest,
or "Bunny Hutch" as we called it,
over the garage on their property.
 
Don's 25th birthday
was 4 days before our
wedding day.
 
I made my gown and beaded my shoes
and my mother and I made the bridesmaid's
and flower girl's dresses.
  
Don's mother and I sewed about a hundred
white covers for the folding chairs for the reception.
 
We were married at
Menlo Park Presbyterian Church,
on a perfect Sunday afternoon.
 
My father walked me down the aisle,
while Vivaldi's "Spring" was played
on flute and pipe organ,
and then he preached the wedding sermon.
 
During our ceremony,
my love accompanied me on guitar,
while I sang
"My Romance". 

Our wedding supper reception was held
in Don's aunt and uncle's back yard.

His Greek aunts made the delicious
food for the buffet,
all the while carrying on their hilarious "arguing."
(This is still one of my very dearest memories of the day.)
 
Our friends and family shared tears
and laughter
and joy.

Our marriage was prayed over 
and blessed.

And it was a good day.


Over the last 25 years,
we have lived a lot of life,
inhabited many houses in several states,
served the Lord and His people in numerous churches,
made A LOT of music,
given birth to our beloved India,
journeyed to China to adopt our beloved Ahnalin, 
prayed through many crises,
and seen many miracles,
packed around about a ton of fabric (!!)
and
dreamed many dreams.

We are still very, very much in love.

I have been blessed with the very best man.

My "Hot Rockin' Hubby" is still the man of my dreams.

God has blessed us so much.
 
Happy Anniversary my dear Don.

I can't wait to see what the next 25 years hold.


Tuesday, August 13, 2013

A Birthday Dress For Ahnalin


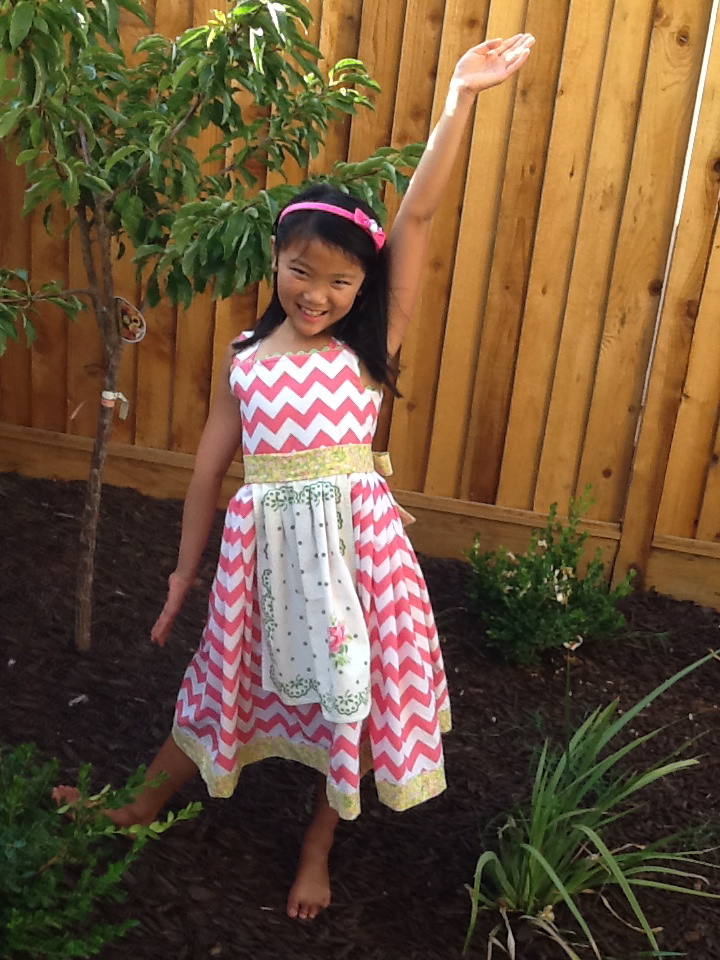
Ahnalin had a birthday.

So, of course, she needed a new dress.


Because who can resist this face?


She wanted the dress to be in her
favorite style sundress.
I don't use a pattern for this style,
as I just cut it based on her current measurements.


And she wanted me to use this
Cath Kidston napkin, that Grandma
bought at a garage sale,
for an apron sewn onto it.


We both love the apron look.


She picked out this vintage 1930s green
rick rack


and the yellow
floral fabric for the sash
and hem band from my stash.


And the Beatrix Potter
buttons were on a card that was dated "1976". 


She was very happy with her birthday dress!


 And of course!


Birthday girls get to lick the beater for the Kitchenaid mixer.


And they get to blow out candles!


Sometimes, they even receive beautiful bride
dolls as birthday presents!


Sometimes they get their very own
little tiny watermelon.


Sometimes they get free scoops of ice cream
at Baskin Robbins.


Ahnalin was very blessed because Grandma Barbara 
and Grandpa John came for the weekend.

You see, Grandma Barbara's birthday
was on Saturday! 

So we had lots and lots of birthday!


I made this pillow for my mom (Grandma Barbara).


And Ahnalin used my embroidery machine 
and made this fleece scarf her.

Grandma loved these gifts,
but I think her favorite was the chocolate fudge cake
with Nutella frosting and coconut that I made for her
from scratch.
Oh it was so good!!


All in all, we had a wonderful
birthday weekend!


Happy Sewing!
Sivje


Friday, August 9, 2013

Sewing For A Royal Baby


It came!!

I am so honored and excited to share with you
that I was a contributor to this beautiful book.

This book was the "baby" of 
the amazingly gifted
 Kathy Barnard and Amelia Johanson.

The lovely dress on the cover
was created by my friend Janet Gilbert
who just launched her own smocking website!


I get chills seeing my name printed there.

I really do not feel I belong in this group of designers.

The contributors to this book are the most 
gifted in the field of heirloom sewing!


Do you see whose names are also there????

This book is filled with gorgeous designs,
complete with patterns on a CD-ROM in the back.


My tiny contribution was drafting a pattern
and writing instructions
for a pair of antique lace booties from
this photo.


These were my samples.


I made them from lace and cotton batiste.
But the original antique lace boots in the book
photo were made from a lovely silk.

The pattern for these little booties is included
in the CD-ROM in the back of the book,
and includes 3 sizes.

I am just so very thrilled to have been 
a part of this book. 

You can purchase it 
at the 

and
Amazon.com


There are patterns for several dresses,


little boy suits,
bubbles,
booties,
bibs,
bonnets,
coverlets and other accessories,


and even 2 christening gowns!!


The patterns ,
 embroidery designs,
and heirloom construction techniques
alone are worth much, much more than the cost of this book. 

But the photography and inspiration are priceless!

I have only taken photos of the pages,
so the actual book pages are not blurry like
my photos. 

All the photos on the pages here, 
except for my two bootie samples,
 are from the book,
and are the property of Sew Beautiful and F&W Media, Inc. 

I hope you purchase this gorgeous book
for yourself and enjoy every lovely detail.

Happy Sewing!

Sivje


Tuesday, July 23, 2013

The New Slipcover For The Old Ugly Sofa- Part 3


Hello again!

I am finally getting around to posting Part 3
of "The New Slipcover For The Old Ugly Sofa".

If you are just happening upon this post,
you can read Part 1 

and then Part 2

Part 3 is all about how I made the
new cushion covers.

 Happy Happy Me!!


As I showed in Part 1,
I had measured around the circumference of the 
cushions for the boxing measurement.

Part of this boxing would include the zipper.
 So the zippered portion of the cushion cover would
have to be in two pieces.

The original (ugly) cushion covers had the zippers
measured to 30 inches, 
so I just used that same measurement.

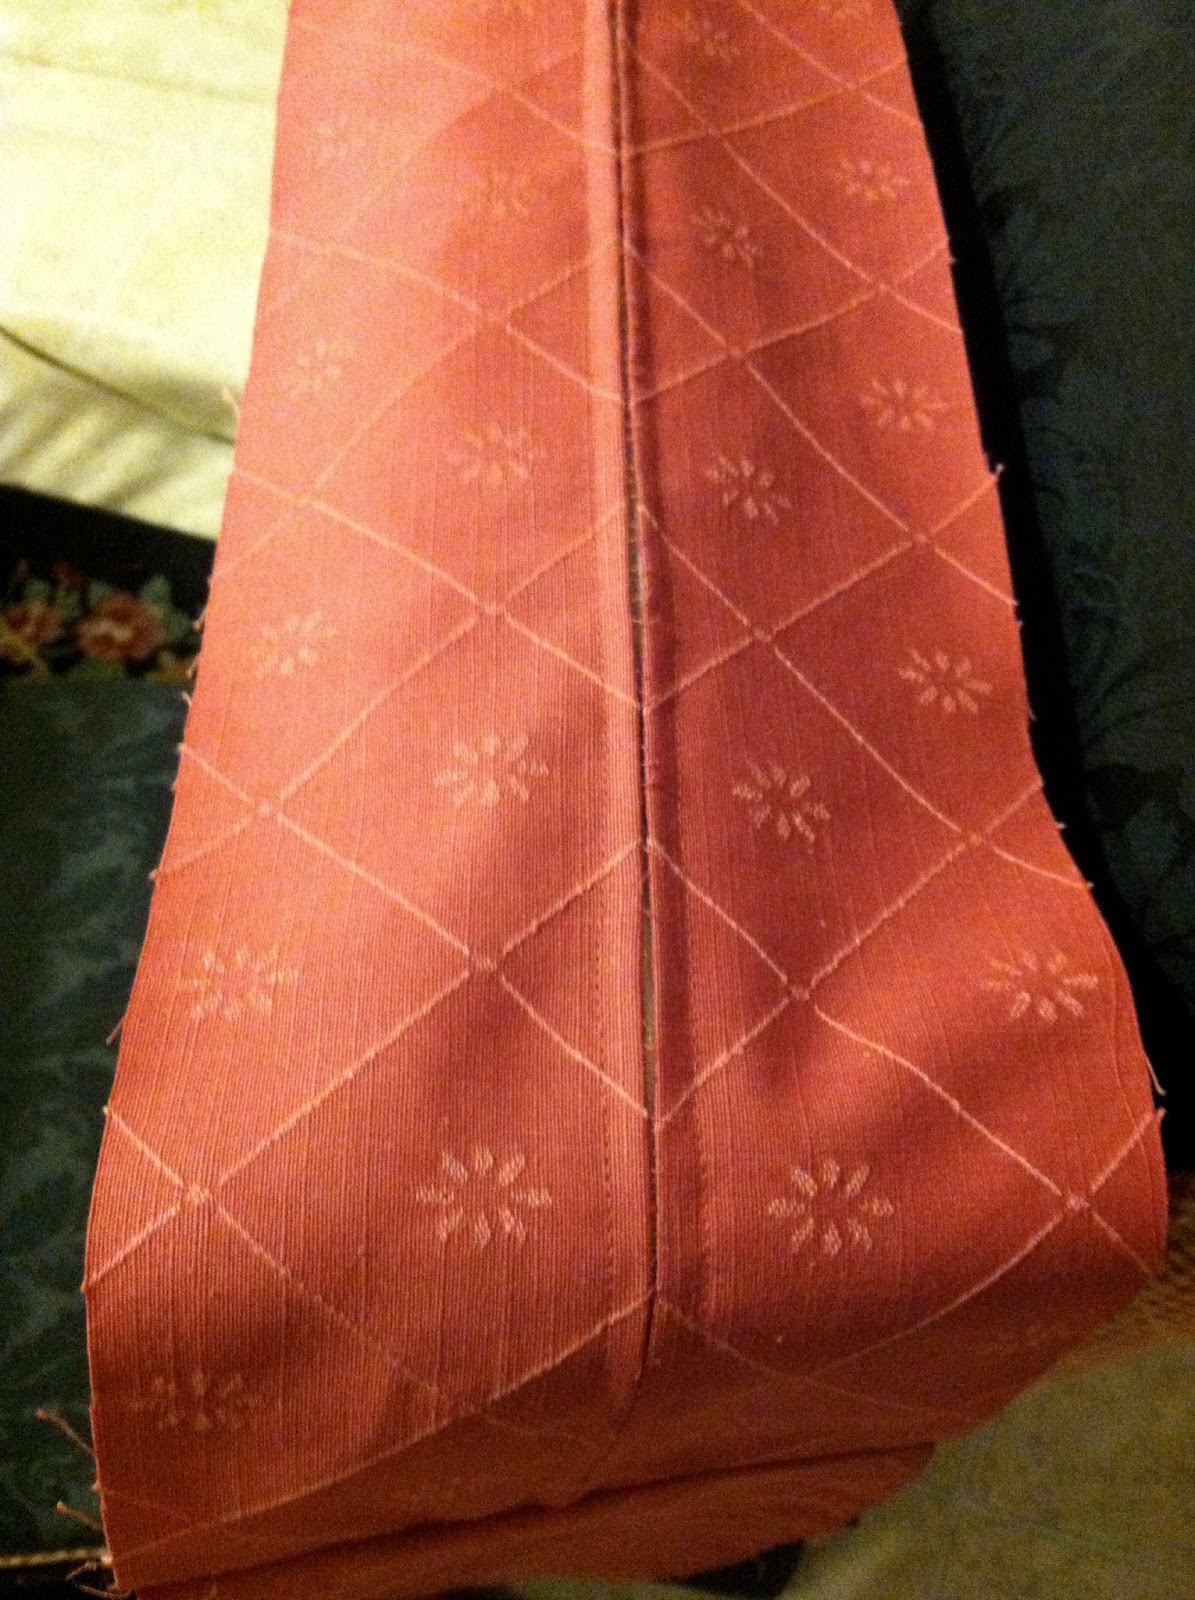
For each cushion, I cut 2 pieces, 
each the length of the zipper.
 Then I sewed them together with a 
basting stitch and pressed
the seams open.


I cut the length of the zipper roll
and made sure I had a zipper pull on it!

I had to be careful not to zip that pull off
before I stitched the ends closed.


I pinned the zipper under neath the seam. 


Then I sewed the zipper in place using my zipper foot.


As I got close to the end of the zipper,
I carefully opened up a few inches of the seam
with my seam ripper. 
Then I lifted my presser foot with the needle still down.
I very carefully pulled the zipper open and past
the presser foot.


Next, I sewed the long boxing piece to
the zipper boxing panel, on each end.
I reinforced this seam and top-stitched it
for strength.

This boxing panel was the length of
the circumference of the cushion,
minus the zipper panel length,
plus about 3 inches for seam allowance
and a little zipper protection.


Then I tried the whole boxing strip on the ugly cushion. 


This is the zippered panel. 


After I tried the boxing panel on the cushion,
I was able to pleat the excess fabric over the
end of the zipper, to create a protective 
fold over the zipper head.

This will prevent that zipper pull from rubbing and
wearing the other fabric out.


After I got the boxing the correct size for the cushion,
I pinned the piping all around both edges.

Notice the cut ends of the piping on each side.


I stitched the piping all around and then left
the ends unstitched.


Where the piping overlapped, there was  
an excess of the piping cord.

So I pulled it out and cut it off.


Then I folded the excess piping fabric and 
wrapped it around the other side of the piping.

The cut ends of the piping cord met I could 
lay the piping fabric over them.


Then I was able to pin the piping down


and stitch it together with less bulk.

Once the boxing was all finished and piped,
it was time to wrap the cushions.


Uh wow.

Lets just get that covered, shall we?

As each of these foam cushions was actually
in pretty decent shape,
I decided to just wrap them with 
fresh batting.
I didn't even bother taking off the current cover.


As I wrapped them tightly, smoothing out the wrinkles,
I pinned the edges in place.


And then I stitched it all in place,
with a doubled thread for strength.


I wrapped the corners and stitched 
them down to the sides.


I cut 6 identical rectangles,
each the dimensions of the cushions plus 
1 inch on each side for the seam allowances.

  
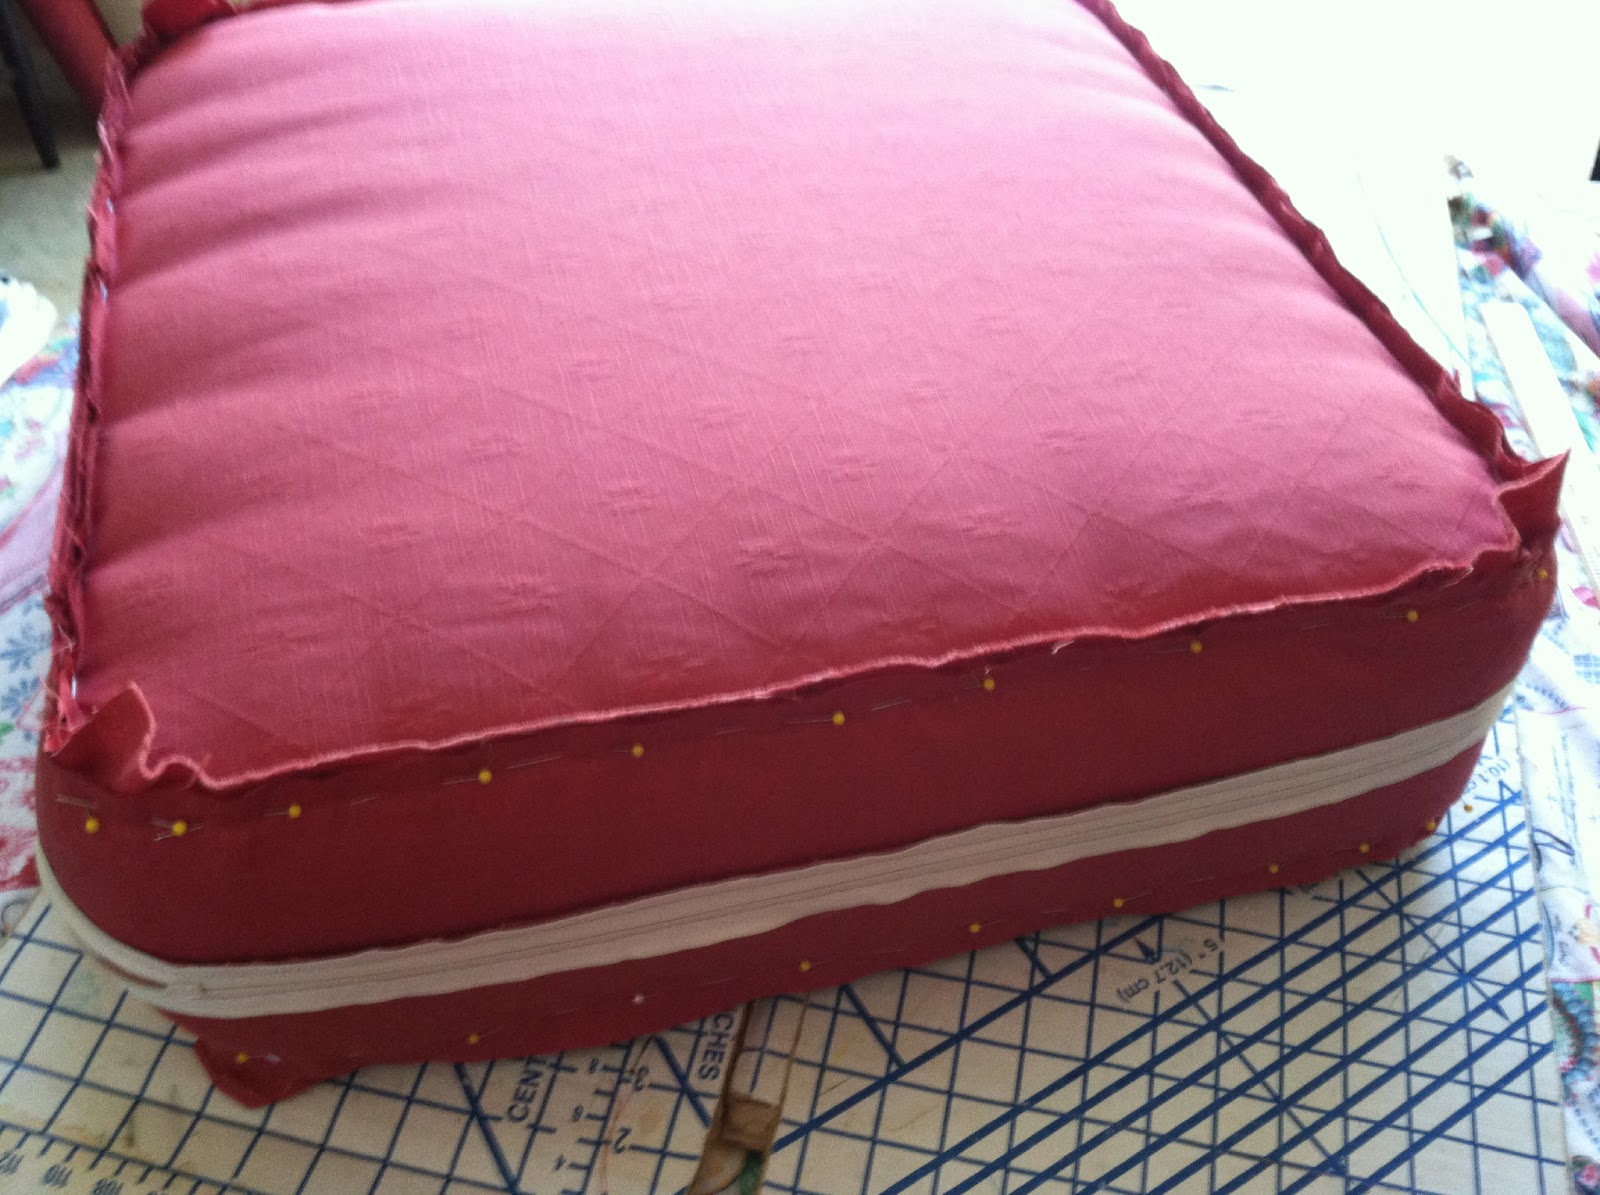
Then I put the boxing on the wrapped cushion, 
wrong side out,
adjusting the zipper panel to the
correct edge of the cushion.

I opened each zipper a few inches so 
that I could unzip it to take it off 
once I was done pinning the top and bottom on.


Using the piping seam as a guideline,
I pinned the top and bottom seat panels
to the boxing.
This is the inside of the front edge of the cushion.


Each corner will end up being slightly rounded because 
of the wrapped cushions.


I pinned it to fit snugly.

As fabric fibers relax from being sat on,
the cushions can get sloppy looking.

I wanted it to fit cleanly so I made it tight.


After I pinned it all the way around, 
I reached into the unzipped area and 
unzipped the rest of the cushion.

Then I VERY VERY VERY carefully
pulled the pinned cushion cover off 
of the wrapped cushion.

I say very carefully because those sharp 
pins stabbed me so many times on this step!

Then all that was left was to 
sew those cushions together!

Once again, I used my zipper foot,
stitching on the piping seam to get
a snug seam for the cushions.
 After I sewed on the piping seam,
I ran another row of stitches,
1/8" away from the first row,
as reinforcement.
I didn't even trim off the 
excess fabric from the corners,
as that extra fabric provided a little more stability.

I turned the covers right side out!!!!!

  
And then  I stuffed those wrapped cushions back into 
the completed cushion covers,
and zipped them closed.

I covered a few old down throw pillows
with some plaid fabric from my stash,
and added some of the leftover 
sofa slipcover piping. 

Then I jumped up and down and did a gleeful
yet embarrassing happy dance!!!!!
Much whooping and hollering
and loud raucous singing took place at this point!!!

The old ugly sofa was completely hidden
and in it's place was exactly the sofa I had 
dreamed of when I bought the fabric
all those years ago!!!!


Thank you for bearing with me
for these 3 long posts.

I hope they have made sense
and maybe even helped you
drum up the courage to take on the
daunting task of making a fitted slipcover
for your sofa. 


Next up, 
Back to school sewing!

Happy Sewing,
Sivje